Wednesday, October 24, 2012

Paper peacock

 There is always a time when you wish to create something new and you can find no crafting material at home.That's when paper comes in handy. I always enjoyed creating stuff out of paper. Be it origami or just paper cutting. 

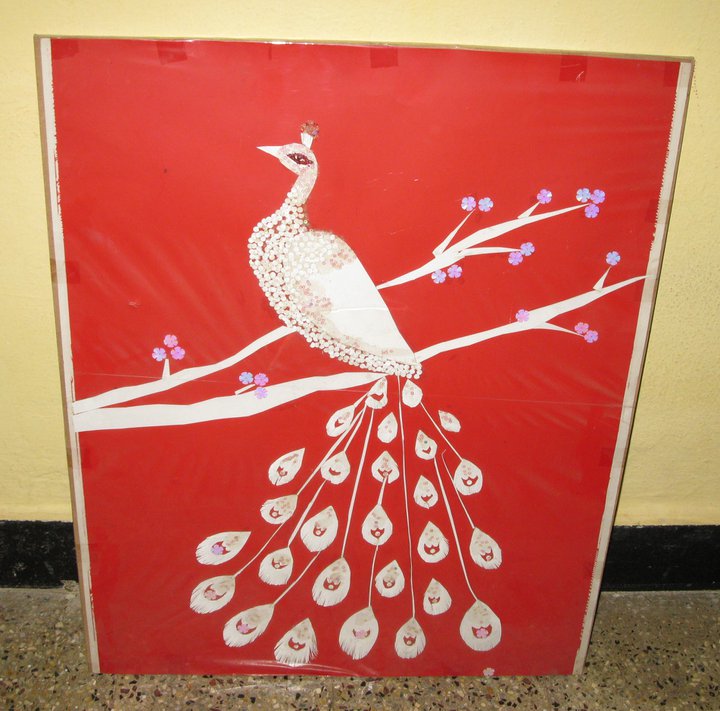
 This peacock made by my mom is created with plain white paper and a few sequins. The basic shape of the peacock was initially cut out. You need some kind of a base/ background for your artwork. Mom chose a board of thermocol and pasted red wrapping paper on it. 
 

 Choose a background suitable for your design. If your artwork is intricate and you chose a background with a lot of detail, they will blur each other out. Cut out the branch and place it on the background. Now cut the peacocks body. Play around with the placement until you are satisfied. Now stick them to the background. The details in the peacocks body are done with the round pieces of paper that come out of a paper punch. Glue the round pieces of paper on the body. Cut out pieces of paper in the shape of feathers, leave some space in the middle. Again, play around with placements until you are satisfied, then glue the feathers. Once all the tail feathers are in place, cut thin strips of paper and glue them connecting the tail and the body. To add drama to the picture , add a few sequins to the branches, in between each feather and on the crown of the bird.  Aaaaaaaaaand we're done!!

 Though it's time taking, you get some stunning pieces of art with this technique. 

Tuesday, October 2, 2012

Fried lamb

I know, I know, I make this look like a cookery blog, but I managed to find some time today, so here you go.
Today's recipe is a delicious lamb fry, one of my favourites. This dish needs some patience to make but the wait is worth it. For this dish..

You will need


Lamb , cleaned and cut into bite sized pieces
Curd 1/2 cup
1/2 lemon juice
Ginger- garlic paste 1 Tbspn
Corriander leaves - Finely chopped
Mint leaves - Finely chopped
Slit green chillies 2-3
Onion, finely sliced 2
Jeera (Cumin) powder - 1 tspn
Corriander powder - 1 tspn
Salt to taste
Red chilli powder 1 tspn
Garam masala powder 1 tspn
Oil


The method:


Clean the lamb and cut into bite sized pieces. Marinate the lamb with Curd, lemon juice, ginger- garlic paste, Corriander leaves, mint leaves, salt, green chillies, and Red chilli powder.

Marinade this mixture for 2 hours. Heat some oil in a heavy bottomed pan. Once the oil is hot, add the onions. Keep stirring until the onions are golden brown. Now add the corriander and cumin powders. Now add the marinated lamb pieces. Keep stirring until the lamb has slightly changed color. Cover the pan and cook on medium heat. Keep stirring in between to avoid burning the lamb. Stir until the lamb oozes oil. Once the pieces are dark brown, not burnt, sprinkle the garam masala on top. Stir for a couple of minutes. The lamb is ready to eat. Tastes great with roti and rice.


Sunday, September 9, 2012

Hornet stings - Home remedies

Last week as I was travelling home by train, I experienced a stinging pain on my wrist. When I lifted up the sleeve I saw a bee like insect stinging me on my wrist. I brushed the insect off my sleeve but had no idea how to reduce the unbearable pain or the swelling which was increasing by the minute. The half hour journey home felt like a few hours. That evening, I did some research about stings,and found a lot of useful information.I thought it would be a good topic to blog about.

Firstly, I found out that the insect which bit me is called a hornet. The hornet is from the bee family, closer to the wasp as it does not leave it's stinger behind. This means it can bite you again and again. That makes it more dangerous than a bee. The first thing you do when a hornet stings you, or even when you see one around you is get away from there.

Hornet stings contain poison, but it is usually quite small in amount.Unless you are allergic to wasp venom, the hornet's sting is not lethal. It would take about 500 hornet stings to kill a human child and 1000 to kill an adult. Also the hornet sting contains 5% acetylcholine. This is known to send pain signals to the brain. Hence the sting of a hornet is way more painful that that of a bee.

Let's talk of the remedies now:

Step 1: Get away from the hornet first. There may be more around or the same insect may return to bite you.
Step 2:  Check for the stinger. This usually does not happen but the hornet may leave a stinger on you. Check for a black stinger. DO NOT use tweezers. They may send the stinger further inside and increase the chance of venom getting in you. Use a sharp object or the edge of a credit card to slowly graze out the stinger
Step 3 : Work on reducing the swelling and numbing the pain. An ice cube can be put to use here. Apply an ice pack or ice cube wrapped in a cloth. This reduces the swelling to a great extent.

DO remember that the pain might take a few hours to reduce. If you feel that the swelling or pain is too much then it is good to get to the emergency room.

 Some more home remedies

A topical pain killer or pills like ibuprofen would work, but consult your physician before taking these.
A thick paste of baking soda applied on the sting/ swelling would reduce pain considerably.
Soak a small cloth in Apple cider vinegar or plain vinegar and apply to the sting until pain reduces.
The same thing can be done with lemon juice too
A freshly cut piece of potato, onion or cucumber held on to the sting reduces the pain
Olive oil can also be applied
Crushed parsley leaves applied topically also provide great relief

The next time some one around you gets stung by a hornet, you know what to do. Always remember to stay away from hives. It's better to be safe than sorry.

Tuesday, August 14, 2012

Chepala pulusu (Fish curry Andhra style)


 I have always loved eating sea food. My parents are from coastal towns and I seem to have inherited this love of sea food from them. One of my favourite dishes is chepala pulusu. Pulusu is a tamarind based curry. This dish is made in different ways across andhra. What I will blog today is the way it is made at my place.

 I am not much of an expert at selecting fish, but my mom says river fish taste great with pulusu. After living out of India for so long, I pick up whichever fish I can get in the frozen food aisle at the super market.

 To make the pulusu you need

Any river fish , 1/2 kilo ,Cleaned and cut to 2.5 - 3 inch pieces
Onions - 2 big, finely chopped
1 Tomato - pureed
3 green chillies, sliced
Tamarind - the size of a small orange
Ginger- garlic paste 1 tspn
Salt to taste
Red chilli powder to taste
Dhaniya (Corriander seed) powder 1/2 tspn
Jeera (Cumin seed) powder 1/4 tspn
Corriander leaves 1/4 bunch, chopped
Garam masala 1/4 tspn
Sugar a pinch
Oil 1-2 Tbspn

Seasoning:
Mustard seeds 1 tspn
Curry leaves 6-7
Green chillies 3 , sliced
Methi (fenugreek) seeds 5-6

The method:
Soak tamarind in water for a few minutes. Take pulp of the tamarind and keep aside.
Apply salt,red chilli powder, dhaniya powder, and jeera powder to the fish and keep aside. If you are worried that the fish might break while cooking, heat the oil in a pan, and lightly roast the fish for a few seconds, remove and keep aside.

In the same pan, add the mustard seeds, after they begin to splutter, add the curry leaves, slit green chillies and methi seeds. Add the chopped onions, stir until transparent. Now add the ginger garlic paste,keep stirring, do not let it burn.

Add the fish pieces to the pan, add the tomato puree, do not stir or the fish might break. Cover the pan and cook at medium heat for 1-2 minutes until the puree is cooked. Now filter the tamarind pulp and add the liquid. Cover the pan and cook at medium heat for 3-4 minutes. Remove the lid and add the garam masala, sugar and carefully shake the pan to allow the masala to mix in the curry. Now add a little red chilli powder, dhaniya powder, jeera powder and salt, shake again. Add the remaining green chillies (you can add one if you do not like spice), corriander leaves. If you feel the curry is too thick for your liking, add a little water to dilute. Cover the pan and cook on low heat for 10-12 minutes.

This tastes great when served with hot rice.

Thursday, August 2, 2012

Anupama Rao - Talent of the week

 I mentioned in an earlier post that I do not have to look far while scouting for talent. How true!! This weeks talent is Anupama Rao, who is family. Anupama is a jewelry designer based in New Jersey.

  Anupama has been designing jewelry as a hobby since a long time. However she started designing for personal and commercial purposes about three years ago.  To improve her craft and to master the finer techniques used in stringing, beadwork & beadweaving, all Anupama needed was a week's training.

 She says she is inspired by the environmental conditions around her and sometimes even by the feedback of her friends and customers about her pieces. Not all her work stems from inspiration, some pieces just come to life in her hands or some fun with colours may turn out a into a beautiful piece.

Anupama's favourite style to work with is stringing/beadwork mainly using beading wire or artistic craft wire & chains. She says she is not a fan of beadweaving but does use the technique when the piece calls for it.

 Anupama extensively uses Crystals (Swarovski, Czech & Celestial) & Pearls (Swarovski, Czech & Cultured Freshwater) in her work as she loves these kind of beads. Below is one of her creations with this material


Till today Anupama has created necklaces, earrings, bracelets, bookmarks, anklets, watches, and eyeglass holders. Her pieces are customized based on what her clients want.

When we asked Anupama about her plans for the future she said "I'm not looking at my jewelry-making expertise as my source of income in the long run, but mostly as a medium of sharing my creativity with others around me & as a de-stresser, besides being busy with my other day jobs & chores."

If you want to get customised jewelry, now you know where to go :)

Wednesday, August 1, 2012

Painting on Glass

Glass painting is one of the easiest forms of painting where your sense of colour plays a stronger part than your painting technique.
There are many types of colours available in the market but the easiest to use are the water based tubes used with a liner tube.

To paint , clean the glass well so that there are no traces of oil or dust. Lay the glass on a plain table , place the design under the glass. Trace the outlines of the design with the liner. Allow the liner to dry for a few hours. The liner stops the colors from flowing out of place.

Once the liner dries start filling the colours in place. Squeeze the tube gently and avoid air bubbles. Once the design is complete, leave aside to dry. Once the painting is dry, turn it around and display

The same techbique can be used on projector plastic sheets. Instead of using the liner, a marker pen can be used.

Tuesday, July 31, 2012

Vegetable Manchurian- Dry

 Most people I know love Chinese food. But, I wonder how many of them ever had Indo-Chinese food. Indo Chinese is the Indianised version of Chinese dishes mostly sold by street vendors but also available in many restaurants. Many Indians believe this is authentic chinese food. Show it to a Chinese and he would probably not recognize the dish at all.

 One of my favourite Indo- Chinese dish is Vegetable Manchurian. There are two versions of this dish, wet and dry. Today I will post the recipe  for Dry Vegtable Manchurian.

 For this you will need :


  • Grated Cabbage 1 Cup
  • Grated Carrot 1 Cup
  • 1 Stalk Chopped Spring onion
  • 2-3 Chopped Green Chillies
  • 1 Tbspn Corn Flour
  • 1 Tbspn Soya sauce
  • 1 Tspn Pepper Powder
  • 1 Tbspn Garlic Flakes
  • A pinch of ajinomoto
  • Salt to taste
  • 1 Tspn sugar
  • Oil 

Method :

Squeeze out the water from the grated cabbage and carrot and mix them well. Ensure that most of the water is out or else it will be difficult to keep the shape intact. In a mixing bowl, add the squeezed carrots, cabbage, corn flour , salt and green chillies. Mix well.
Make small balls out of this mixture. There will be no need to add any water to this mixture. I usually make fist sized balls as I have super tiny hands, the usual size is about that of a kofta.
Heat oil in a wok and deep fry the balls until golden brown. Drain and take out into a tissue lined bowl to absorb excess oil. Keep aside.
Heat another pan and add 2 Tbspn oil. Saute the Garlic, some more green chillies, ginger and spring onions and stir fry for a few seconds. Add the vegetable balls and stir fry for a few minutes. Reduce the heat to medium and add soy sauce and sugar. Mix well and cook for two minutes.
Garnish with spring onions and corriander